The List View Control |
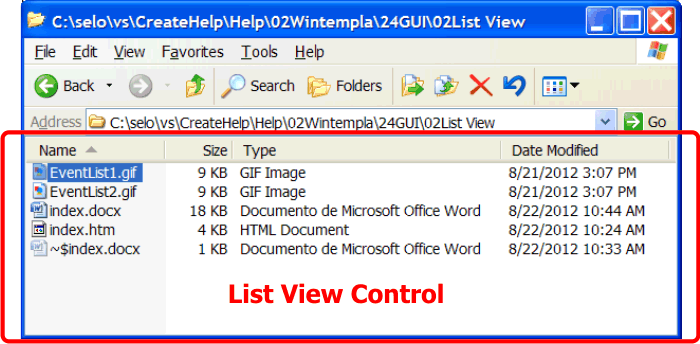
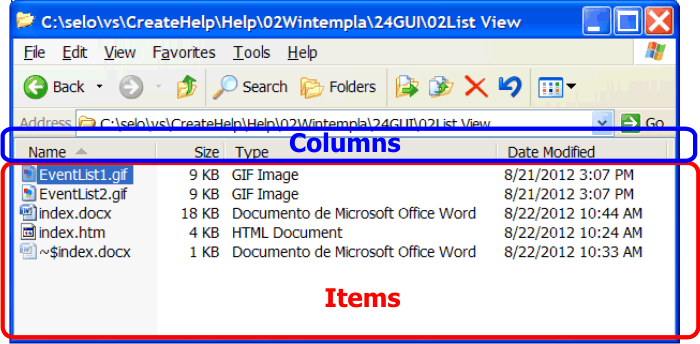
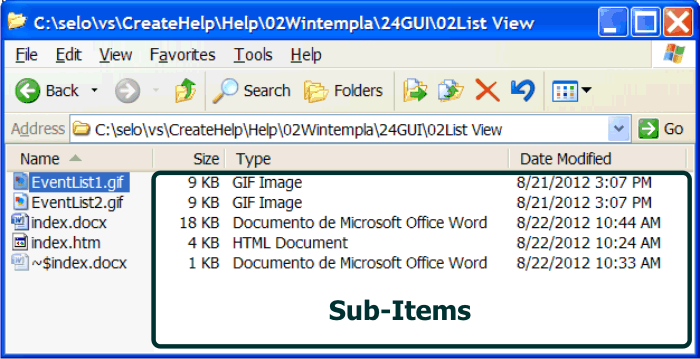
| The List View control is one of the most powerful controls. The List View control has two collections: a collection of columns and a collection of items. The control must have at least one column to operate correctly. Each column has at least a text that may display at the top of the control. Each item has an index, a text, an image and numeric value. The index indicates the position of the item in the list. The text provides information so that the user can identify the item. The image is optional and provides a graphic feedback to the user. The numeric value can be used to store a custom value such as a STL container index or a primary key in a table from a database. When, there is more than one column, each item has sub-items. Each sub-item has an index and a text. The sub-item index is used to indicate the position of the column. The text of the sub-item provides additional information to the user about the item. El control de List View es uno de los controles más poderosos. El control de List View tiene dos colecciones: una colección de columnas y una colección de artículos. El control debe tener al menos una columna para operar correctamente. Cada columna tiene al menos un texto que se puede mostrar en la parte superior del control. Cada artículo tiene un índice, un texto, una imagen y un valor numérico. El índice indica la posición del artículo en la lista. El texto proporciona información de tal forma que el usuario pueda identificar el artículo. La imagen es opcional y proporciona una retroalimentación gráfica al usuario. El valor numérico puede ser usado para almacenar un valor personalizado tal como un índice de un contenedor de la STL o una llave primaria de una tabla en una base de datos. Cuando, hay más de una columna, cada artículo puede tener sub-artículos. Cada sub-artículo tiene un índice y un texto. El índice del sub-artículo es usado para indicar la posición de la columna. El texto del sub-artículo proporciona información adicional al usuario acerca del artículo. |
| Tip |
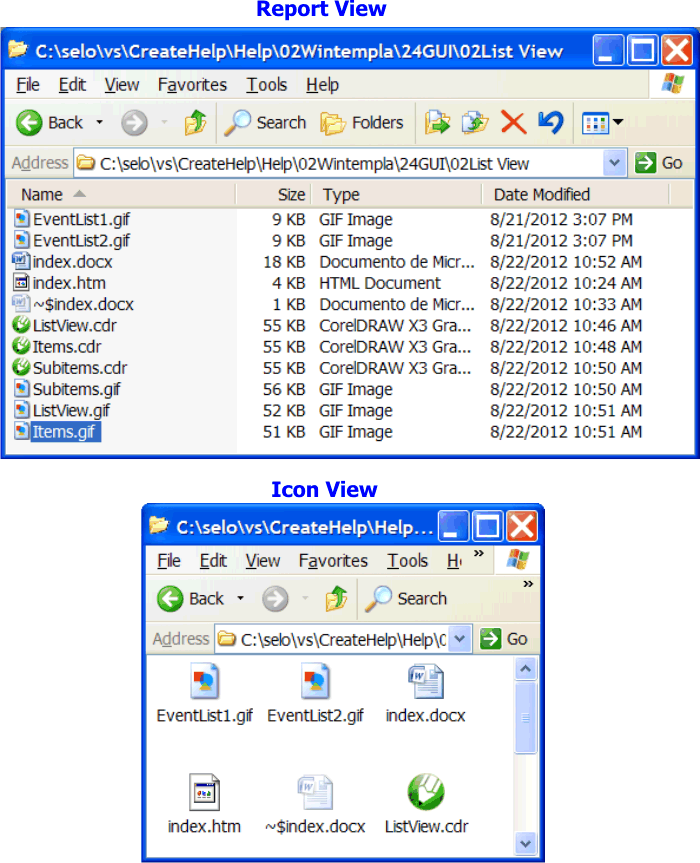
| The List View control can change the way it is displayed, some of the views are: icons, report, etc. The computer desktop and the computer explorer use a List View control to display the files in the computer. El control de List View puede cambiar la forma en la que aparece, algunas de sus vistas son: iconos, reporte, etc. El escritorio de la computadora y el explorador de la computadora usan el control de List View para mostrar los archivos de la computadora. |
| Problem 1 |
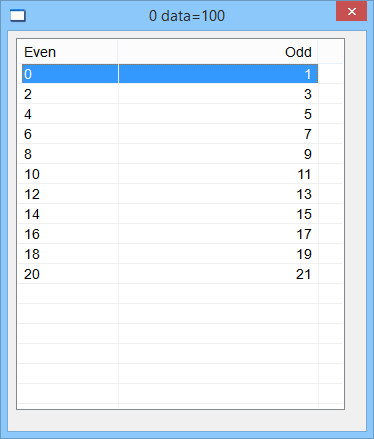
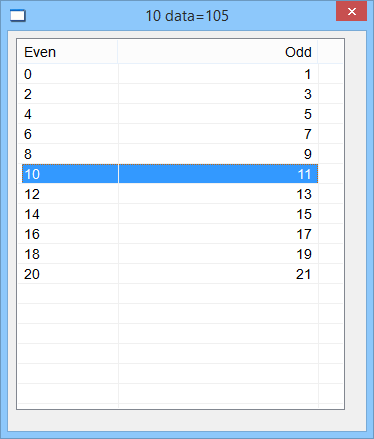
| Create a program called EvenList to show the list of even and odd numbers as shown below using a List View control. When the user double clicks an item in the list, the item value appears in the window title. Cree un programa llamado EvenList para mostrar la lista de los números pares e impares como se muestra debajo usando el control de ListView. Cuando el usuario hace doble clic en un artículo, el valor del artículo aparece en el título de la ventana. |
| EvenList.cpp |
| void EvenList::Window_Open(Win::Event& e) { //________________________________________________________ 1. Column Setup lv1.Cols.Add(0, LVCFMT_LEFT, 100, L"Even"); lv1.Cols.Add(1, LVCFMT_RIGHT, 200, L"Odd"); //________________________________________________________ 2. Insert rows (items) LPARAM data =0; for(int i = 0; i <= 10; i++) { data = 100+i; lv1.Items.Add(i, Sys::Convert::ToString(2*i), data); lv1.Items[i][1].Text = Sys::Convert::ToString(2*i+1); } } void EvenList::lv1_ItemActivate(Win::Event& e) { //________________________________________________________ When the user double clicks a row (item) const int selectedIndex = lv1.GetSelectedIndex(); if (selectedIndex < 0) return; // LPARAM data = lv1.Items[selectedIndex].Data; wstring wdata = Sys::Convert::ToString((int)data); this->Text = lv1.Items[selectedIndex][0].Text; this->Text += L" data="; this->Text += wdata; } |
| Problem 2 |
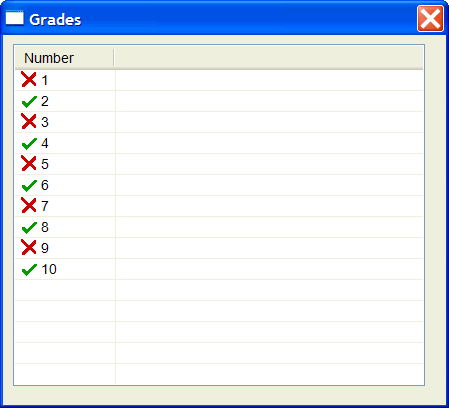
| Create a program called Grades to list of numbers from 1 to 10. A green correct mark should be displayed in the even numbers in a list view control. A red cross should be displayed in the odd numbers. Cree un programa llamado Grades para listar los números del 1 al 10. Una paloma verde de correcto debe mostrarse en los números pares en un control de List View. Una cruz roja debe mostrarse en los números impares. |
| Step A |
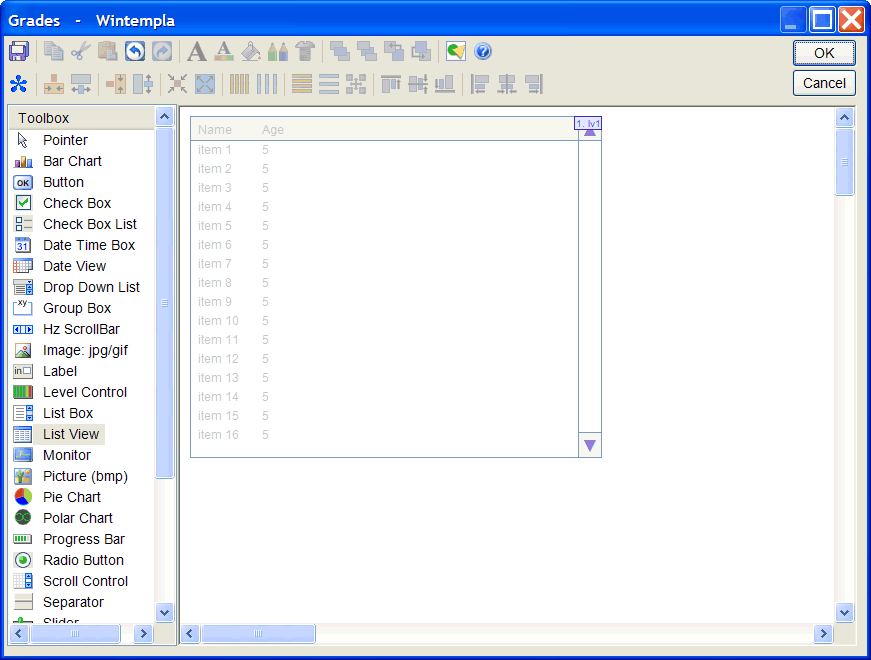
| Create the project and using Wintempla insert a List View control as shown. Cree el proyecto y use Winempla para insertar un control de List View como se muestra. |
| Step B |
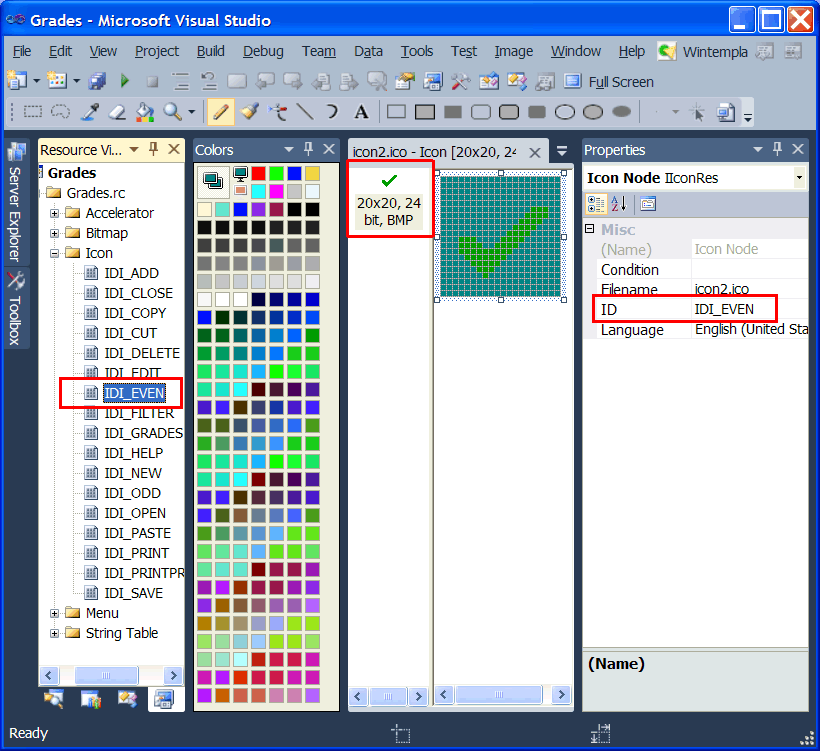
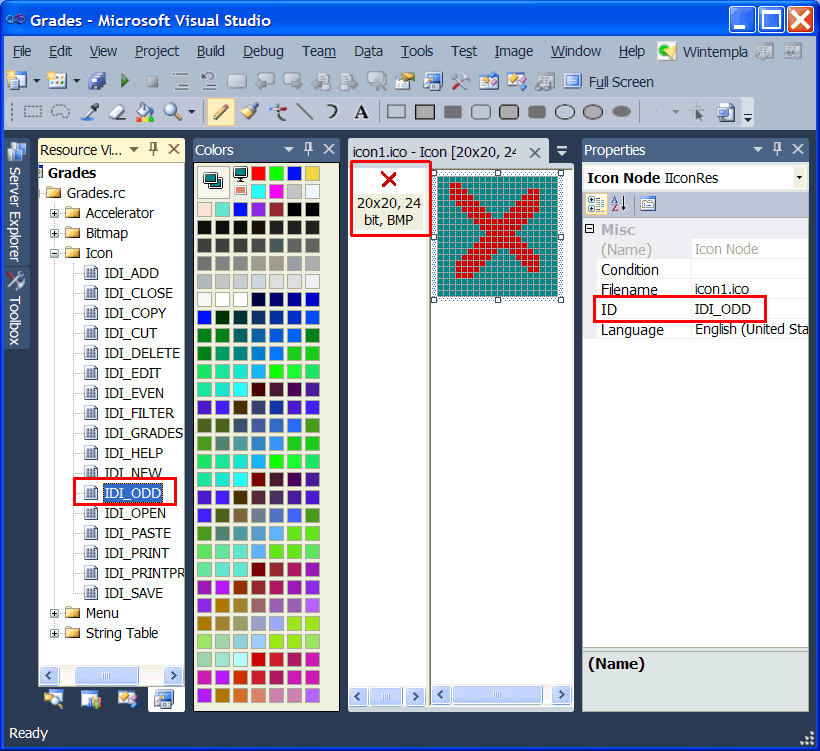
| Open the Resource View and insert two icons of size 20 by 20 pixels and 24 bits as shown. Set the names to: IDI_EVEN and IDI_ODD. Be sure to leave only one image inside the icon. |
| Grades.h |
| #pragma once //______________________________________ Grades.h #include "resource.h" class Grades: public Win::Dialog { public: Grades() { } ~Grades() { } Win::ImageList imageList; protected: ... }; |
| Grades.cpp |
| void Grades::Window_Open(Win::Event& e) { //____________________________________ Create and set the image list imageList.Create(20, 20, 2); imageList.AddIcon(this->hInstance, IDI_EVEN); imageList.AddIcon(this->hInstance, IDI_ODD); //________________________________________________________ lv1 lv1.SetImageList(imageList, true); lv1.Cols.Add(0, LVCFMT_LEFT, 100, L"Number"); for(int i = 1; i <= 10; i++) { if (i%2 == 0) // Even { lv1.Items.Add(i-1, 0, Sys::Convert::ToString(i)); } else { lv1.Items.Add(i-1, 1, Sys::Convert::ToString(i)); } } } |
Column Width |
| Each column in a list view control must have a width. There are several methods you can use to compute the best method for each column. Cada columna en el control de list view debe tener un ancho. Hay varios métodos que usted puede usar para calcular el mejor método para cada columna. |
| Step Method 1 |
| Use a percent for each column. The following example shows how to add two columns, the first one will be 60% of the total width, the second column will 40% of the total width of the control. Use un porcentaje para cada columna. El siguiente ejemplo muestra como agregar dos columnas, la primer columna será 60% del ancho total, la segunda columna ocupará el 40% del ancho del control. |
| Program.cpp |
| const int col1_width = (int)(0.6*lv1.Width - Sys::Metrics::GetVScrollWidth() - 10 + 0.5); const int col2_width = (int)(0.4*lv1.Width - Sys::Metrics::GetVScrollWidth() - 10 + 0.5); lv1.Cols.Add(0, LVCFMT_LEFT, col1_width, L"Day"); lv1.Cols.Add(1, LVCFMT_RIGHT, col2_width, L"Activity"); |
| Step Method 3 |
| In some cases, one column in the control benefits from using as much space as possible while the other columns are of a fixed width as shown in the following example. Note that the column 2 will display integer numbers. En algunos casos, una columna se beneficia de usar tan espacio como sea posible mientras las otras columnas son de un ancho fijo como se muestra en el siguiente ejemplo. Note que la columna 2 mostrará números enteros. |
| Program.cpp |
| SIZE size; lv1.GetTextExtent(L"00000", size); const int col2_width = size.cx; const int col1_width = lv1.Width - Sys::Metrics::GetVScrollWidth() - col2_width - 10; |
Items Collection |
The main operations of the items collection
Las principales operaciones de la colección de artículos son:
|
Items Collection in a Web List View |
| The Items Collection is a vector of List Items. Each List Item is a vector of wstrings. The code shown below illustrates how to access the text in row zero and column 5. La colección de artículos es un vector de List Items. Cada List Item es un vector de wstrings. El código de abajo ilustra como accesar el texto en el renglón cero y la columna 5. |
| Program.cpp |
| wstring name = lvSale.Items[0].Text[5]; |
| Problem 3 |
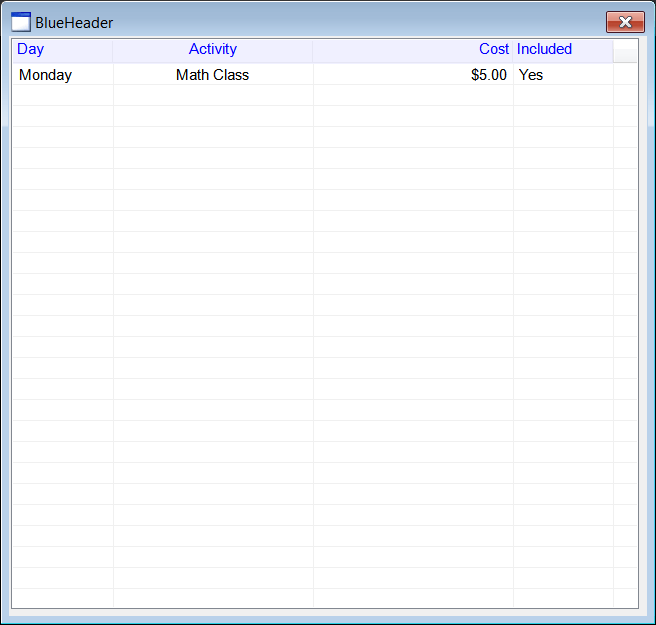
| Create a dialog application called BlueHeader to modify the top part of the list view control (the header). After creating the application, insert a list view control. Then, click anywhere in the editor to open the Window events, activate the DrawItem event. Observe that the event is not in the list view control but on the main window or dialog. Cree un programa llamado BlueHeader para modificar la parte de arriba del control de list view (el encabezado). Después de crear el programa, inserte un list view. Entonces, haga clic en el editor para abrir los eventos de la ventana, active el evento de DrawItem. Observe que el evento no es en el control de list view, pero en la ventana principal o diálogo. |
| BlueHeader.h |
| #pragma once //______________________________________ BlueHeader.h #include "Resource.h" class BlueHeader: public Win::Dialog { public: BlueHeader() { } ~BlueHeader() { } static WNDPROC originalProc; static LRESULT CALLBACK ListProc(HWND hWnd, UINT message, WPARAM wParam, LPARAM lParam); protected: . . . }; |
| BlueHeader.cpp |
| . . . void BlueHeader::Window_Open(Win::Event& e) { originalProc = lvData.SetProc(ListProc); //________________________________________________________ lvData lvData.Cols.Add(0, LVCFMT_LEFT, 100, L"Day"); lvData.Cols.Add(1, LVCFMT_CENTER, 200, L"Activity"); lvData.Cols.Add(2, LVCFMT_RIGHT, 200, L"Cost"); lvData.Cols.Add(3, LVCFMT_LEFT, 100, L"Included"); lvData.Items.Add(0, L"Monday"); lvData.Items[0][1].Text = L"Math Class"; lvData.Items[0][2].Text = L"$5.00"; lvData.Items[0][3].Text = L"Yes"; lvData.SetHeaderCustomDrawing(true); } LRESULT CALLBACK BlueHeader::ListProc(HWND hWnd, UINT message, WPARAM wParam, LPARAM lParam) { if (message == WM_DRAWITEM) { ::SendMessage(::GetParent(hWnd), message, wParam, lParam); return TRUE; } return CallWindowProc(originalProc, hWnd, message, wParam, lParam); } void BlueHeader::Window_DrawItem(Win::Event& e) { //______________________________________________________________________ 1. Local variables const int ctrlID = (int)e.wParam; // You should process WM_MEASUREITEM DRAWITEMSTRUCT * drawItem = (DRAWITEMSTRUCT *)e.lParam; HWND ctrl = drawItem->hwndItem; int index = drawItem->itemID; PAINTSTRUCT ps; ps.hdc = drawItem->hDC; RECT rect = drawItem->rcItem; const bool isSelected = ((drawItem->itemState & ODS_SELECTED) != 0); const bool hasFocus = ((drawItem->itemState & ODS_FOCUS) != 0); const bool headerControl = (drawItem->CtlType == ODT_HEADER); if (headerControl == false) return; //______________________________________________________________________ 2. Get item text and format wchar_t text[256]; HDITEM item; item.mask = HDI_FORMAT | HDI_TEXT; item.pszText = text; item.cchTextMax = 256; if (::SendMessage(ctrl, HDM_GETITEM, (WPARAM)(int)index, (LPARAM)&item) == FALSE) return; //______________________________________________________________________ 3. Paint background CG::Gdi gdi(ps, false); COLORREF backColor = RGB(240, 240, 255); CG::Brush brush(backColor); gdi.FillRect(rect, brush); //______________________________________________________________________ 4. Paint text gdi.SetTextColor(RGB(0, 0, 255)); gdi.SetBkColor(backColor); SIZE size; gdi.GetTextExtentPoint32W(L" ", size); const int offset = size.cx; if (text[0] != L'\0') { gdi.GetTextExtentPoint32W(text, size); if (item.fmt & HDF_CENTER) { gdi.TextOut(rect.left + (rect.right - rect.left - size.cx)/2, rect.top, text); } else if (item.fmt & HDF_RIGHT) { gdi.TextOut(rect.right - size.cx - offset, rect.top, text); } else // HDF_LEFT { gdi.TextOut(offset + rect.left, rect.top, text); } } //______________________________________________________________________ 5. Paint borders CG::Pen pen(PS_SOLID, 1, RGB(230, 230, 245)); gdi.Select(pen); gdi.MoveToEx(rect.left, rect.bottom-2); gdi.LineTo(rect.right-1, rect.bottom-2); gdi.LineTo(rect.right-1, rect.top); if (hasFocus == true) gdi.DrawFocusRect(rect); e.returnValue = TRUE; } |